Plugins
Apart from the integrated, and mostly GUI-controlled, functionality, Catana also supports plugin system, i.e., scripting-based features that may extend Catana in particular ways. Thanks to this, you can develop a custom functionality while taking advantage of Catana's modeling and visualization possibilities.
Terminology
Before diving into the topic, let us clarify some terms:
- Script: Script, in the context of this manual, is a piece of code that can be executed by Catana. Thus, the goal of scripts is to perform a given specific task. Individual script files are distributed with *.js or *.jspy extension.
- Plugin: Plugin can be seen as a collection of scripts working together to extend Catana with a more complex functionality. Plugin file has a JSON format and is distributed with *.catplg extension. This file lists general information about the plugin, as well as names of scripts and dependencies needed for this plugin to run.
- Dependency: In the context of the plugin system, dependency of a plugin Y is a plugin X that is needed for Y to run correctly (thus, plugin Y depends on X, i.e., lists it among its dependencies).
- Scope: In the context of scripts/plugins, scope refers to the name of the plugin the given script belongs to, or an empty string if the script does not belong to any plugin, i.e., lies in a so-called "global scope". The scope is an important concept enabling to clearly identify which script to execute – there might exist more scripts with the same name but they will never come from the same scope.
- Loading a script/plugin: Loading (also installing) a plugin or script to Catana means to upload the corresponding files to Catana (either via UI or with an CLI command) to make them available for execution.
- Attaching a script (to the update call): If you encounter some references to attaching a script to the update (call) or detaching it, it refers to a feature of Catana enabling you to mark selected scripts as "attached", causing Catana to execute them repeatedly (typically roughly 60 times per second but this is not guaranteed). Such scripts will be executed indefinitely until they are "detached" again.
Overview
The general concept of Catana's extensibility gives users and developers a possibility to open the web application, load and execute scripts and plugins, and achieve all of that without a need to install something on the computer, download the whole software or modify it in any other way. One limitation of the current system is that loaded scripts and plugins are not preserved between Catana sessions, i.e., if you reload or quit Catana, you will have to load all needed plugins again. However, plugins loaded during the last session can be previewed/restored via the UI (Last Session option in Plugin Management window). Finally, all plugin-related functionality is accessible primarily via the Plugins menu in the Top Bar or via Command-line interface (layout).
Plugin Repository
Before diving into the details of the plugin system, let us highlight the existence of public repository for Catana plugins. This repository enables to quickly find and install selected plugins into Catana, and is open for contributions. Thus, if you are considering to develop a new Catana plugin, we encourage you to try to publish it on the repository above, so others can easily find it. :)
Loading a script
If you want to load a script file (*.js, *.jspy) and not a whole plugin (since sometimes having just a script is enough), you can do so either via the Plugins menu, as illustrated below, or you can open the Command-line interface (CLI) layout and use the following command:
install_script("https://url-of-script-file")
Loading a plugin
Loading a plugin works in a similar manner as in the case of scripts. Keep in mind, though, that when uploading locally stored plugin, you have to upload (at the same time) the main plugin file (*.catplg) and all script files it references.
To install plugins from a remote location, you can use the following command:
install_plugin("https://url-of-plugin-file")
Alternatively, if you want to load a plugin from the official plugin repository, the argument of the install_plugin does not have to be a URL but you can provide only the name of the plugin file in this scenario (without extension).
Executing a script
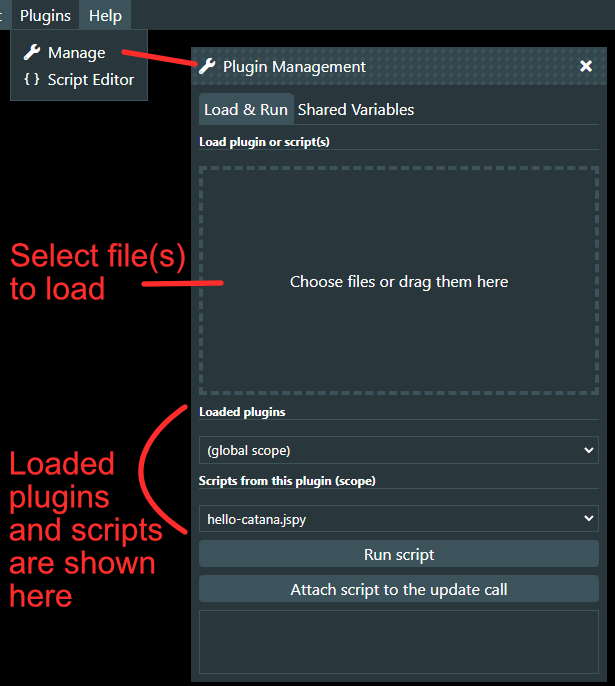
The easiest way to execute a loaded script is to go to Plugins - Plugin Management window, select the plugin containing the script, then script to execute and then press "Run script" button. You can also execute scripts from other scripts or from Catana's CLI layout. To use the CLI to execute a script, use the following command:
# Executing a script without arguments
run_script("scope::script_name")

# Executing a script with two arguments – text "Argument 1" and number 42.
run_script("scope::script_name", "Argument 1", 42)
As mentioned in the Terminology, the scope is the name of the plugin the script comes from, or an empty string if the script comes from "global scope".
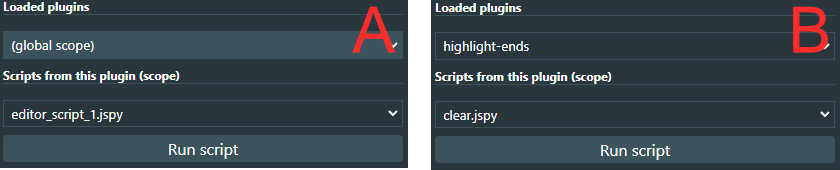
In the image above, you can see examples of two different scripts – one comes from "global scope" (A), the second one from plugin "highlight-ends" (B).
To execute these scripts, you would use following commands:
# (A) executing a script from global scope – scope information can be omitted
run_script("editor_script_1.jspy")

# (B) executing a script from plugin
run_script("highlight-ends::clear.jspy")
Some scripts might not be designed just for a single execution but for repeated operations.
For such scripts, Catana offers the possibility to attach (and detach) them to (from) the update call (see Terminology for more).
If the script is supposed to work this way, you may need to execute it a bit differently.
If you want to perform attaching or detaching via UI, just press correspoding button in the Plugin Management window instead of using the "Run script" button.
To perform this task via CLI, you can use the following commands:
# After this call, script will be automatically repeatedly executed by Catana
attach_to_update("scope::script_name")

# This call stops the given script from being repeatedly executed by Catana
detach_from_update("scope::script_name")
Executing a plugin
Plugins by itself are not executable, i.e., they just describe a collection of scripts performing some common tasks. Thus, the way the plugin works – whether it has some UI you can use, or a script you should execute, etc. – is entirely on the developer and is expected to be documented somewhere when the plugin is being published.
Shared variables
Scripts are isolated, i.e., they can call Catana functionality but the variables and functions defined in the script are always valid only for the given script and its particular execution. Thus, if you take a look at the script's code, every time it is run, it is completely executed from top-to-bottom without any knowledge of previous executions. However, in some cases, it might be beneficial to preserve some value beyond the lifetime of a single script execution. For example,
- when the script wants to share some values with other scripts, or
- when the script is executed repeatedly and it wants to carry some information between executions, or
- when it wants to read some value defined, for example, via UI.
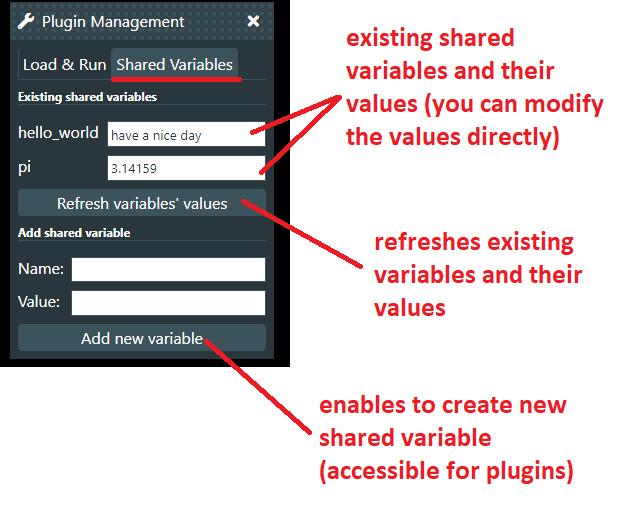
For these reasons, the concept of shared variable was introduced. Shared variables can be defined either via user interface (below) or manipulated in scripts or CLI. As the name suggests, the value of these variables is accessible to every script (no matter the scope), as well as the user.
If you want to set or read shared variables via scripts or CLI, you can use following commands:
# Set value of shared variable "app_name" to "Catana".
# If the variable does not yet exist, this call will create it.
set_shared_var("app_name", "Catana")

# Returns contents of the shared variable "app_name"
get_shared_var("app_name")
Command-line interface (CLI)
While plugins and scripts are suitable for a more complex functionality, many commands can be executed directly via integrated Command-line interface (available via corresponding Layout). The CLI internally uses JSPython syntax (more on this in later sections) and the best way to see what can be done is to start with the help command, listing all the available functions.
Writing scripts
This chapter provides you with an information about scripting, namely how to develop new scripts.
Supported languages
Catana scripts can be written in one of the two following programming languages:
- JSPython (interpreter website)
- *.jspy extension
- Python-like syntax, possibility to work directly with JavaScript objects
- Same language as the one used in Catana's CLI
- JavaScript:
- *.js extension (Catana also supports NGL Viewer scripts with *.ngl extension but these are not guaranteed to work)
- Regular JavaScript
Integration with Catana
It is expected that your scripts will access Catana's functionality. To make the integration with Catana simpler, Catana provides Scripting API enabling to perform wide range of tasks through a single interface. Apart from that, the code you write becomes, at the point of a script execution, a body of a function with a given set of arguments. These arguments are variables and functions you can easily access in your code, knowing that they will be given a particular value during runtime.
For JSPython language, you can directly access primarily:
- variable
stagereferencing an instance of aStageclass. - array
argsstoring arguments passed to this script - function
logenabling to log textual output to GUI consoles - object
globalthat enables you to freely read and add new properties to it (e.g.,global.number = 42). The purpose of this object is to enable creation of variables in the global script context, i.e., valid for the whole JSPython script (since JSPython does not supportglobal varNamedirective at the moment). The values stored into this object are preserved only for the one given execution of a script code. - all public scripting API functions in a "snake_case" style manner.
In case of JavaScript plugins, you can access mainly:
- variable
stagereferencing an instance of aStageclass. - array
argsstoring arguments passed to this script - variable
scriptingApireferencing theScriptingApiclass. - function
logenabling to log textual output to GUI consoles
Editor
In the end, scripts are just text files and thus any text editor or IDE can be used for their creation. However, to facilitate the coding tasks, Catana provides integrated Script Editor (accessible via Plugins menu) that enables to write script code directly in the browser/Catana. This editor does not only allow for the execution of the script, but also its addition to loaded scripts or a download of the script file. The Script Editor also offers basic syntax highlighting features, making the development easier and less error-prone.
Examples
This section shows a few examples of simple script codes that may serve as a basis for your solutions. The simplest way to try out these examples is to open the Catana's Script Editor, select appropriate scripting language, write the code and run it.
Loading a PDB file
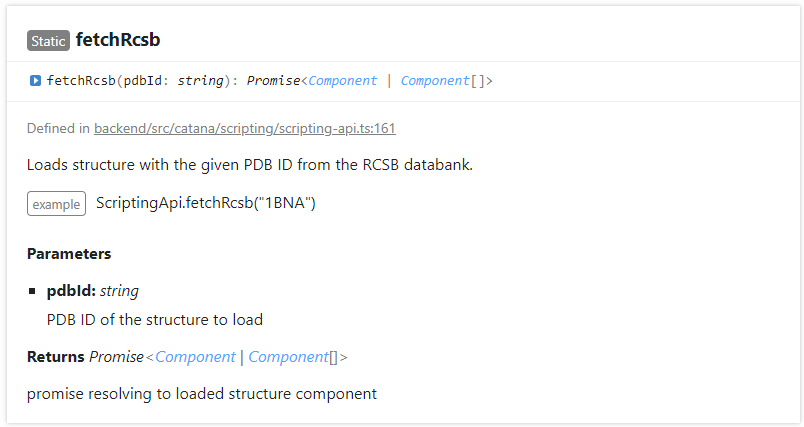
Taking a look at the Scripting API, one can find that there is a public function called fetchRcsb that serves this purpose, with the expected parameters and return type described in the documentation.
 As written in the sections above, JSPython plugins can directly access all public Scripting API functions in a "snake_case" manner. Thus, this function is available in JSPython scripting as
 fetch_rcsb. For JavaScript plugins, we will have to access the desired function through the scriptingApi variable. In the end, the code (for loading 1BNA molecule) may look as follows:
JSPython:
fetch_rcsb("1bna")
JavaScript:
scriptingApi.fetchRcsb("1bna")
Loading a PDB file and adding custom representation
In this example, we will again use functions from the Scripting API to create a script that loads a PDB file, removes all of the representations that are added by default, and adds only one, "ball+stick", representation.
JSPython:
comp = fetch_rcsb("1bna")
remove_component_representations(comp)
add_representation_to_component(comp, "ball+stick")
JavaScript:
scriptingApi.fetchRcsb("1bna").then(comp => {
    scriptingApi.removeComponentRepresentations(comp);
    scriptingApi.addRepresentationToComponent(comp, "ball+stick");
});
One thing to note here - the function fetchRcsb returns Promise (as can be seen in the documentation). In JSPython, promises are handled synchronously, thus the user does not have to wait for their completion using then as in JavaScript.
Generating multiple copies of DNA with the given sequence
For this example, we will show a code that asks the user to input a sequence and number of copies to make, and then creates a corresponding number of DNA double strands, positioned one above the other.
JSPython:
defSeq = "GATTACA"
seq = show_prompt("Please provide DNA sequence: ", defSeq)
copies = show_prompt("How many copies?", 2)

log("Creating " + copies + " copies of sequence: " + seq)

for i in range(0, copies):
    comp = create_ds_dna(seq)
    set_component_position(comp, [0, i * 20, 0])
JavaScript:
let defSeq = "GATTACA";
let seq = scriptingApi.showPrompt("Please provide DNA sequence: ", defSeq);
let copies = scriptingApi.showPrompt("How many copies?", 2);

log("Creating " + copies + " copies of sequence: " + seq);

for(let i = 0; i < copies; ++i) {
    let comp = scriptingApi.createDsDna(seq);
    scriptingApi.setComponentPosition(comp, [0, i * 20, 0])
}
Processing a GET/POST request
This example will show you how to realize general GET and POST requests via Catana's Scripting API. You can also use other approaches to reach the same goal (e.g., fetch API in JavaScript) but the purpose of Catana's abstraction is to have a readily available method without needing to search for solutions for the specific scripting language.
First, let's start with a GET request, expecting that the destination server provides a JSON response (thus we will use httpGetObject function from the API). In this example, your IP address should be outputted (in case the httpbin.org server still works at this point).
JSPython:
response = http_get_object("https://httpbin.org/get")
log(response.origin)
JavaScript:
scriptingApi.httpGetObject("https://httpbin.org/get").then(response => {
    log(response.origin)
});
Now, we will perform a POST request and process the server's response to it. In this case, we have to provide an information about the type of data we upload to the server (decided by the type of function we use – e.g., *_text), and the type of data we expect ("json" argument in this case). The actual data we send are the last argument of the functions. In this example, considering that the httpbin.org server still works, the outputted data should be the same as the ones you uploaded to the server (i.e., "Hello World" should be returned).
JSPython:
response = http_post_text("https://httpbin.org/post", "json", "Hello World")
log(response.data)
JavaScript:
scriptingApi.httpPostText("https://httpbin.org/post", "json", "Hello World").then(response => {
    log(response.data);
});
Developing a new plugin
Development of a new plugin basically means to write scripts realizing the plugin functionality, and then to create a plugin file (*.catplg) providing all the important metadata so Catana can understand what files to load.
Scripting examples
We will start with additional scripting examples. However, this time, we will focus not on the "core functionality" but rather on the typical use cases that may occur during the development of a plugin, in order to show you how to solve them within the context of Catana's plugin system. Finally, examples in this section will be written exclusively in JSPython – we hope that if you decide to opt for the JavaScript scripting possibilities, examples above sufficiently demonstrated some of the main differences.
Calling one script from another
Use integrated Script Editor or any text editor to create a file first.jspy with the following content:
log("Hello ...")
run_script("second.jspy")
Then, create a file second.jspy with the following content:
log("... World")
Now, go to Plugin Management window, upload both files to Catana and run the first.jspy script. If you look at the text output at the bottom of this window, you should see the following outcome:
Hello ...
... World
Processing arguments
Scripts can be executed with arguments. For this reason, Catana exposes variable args in the scripting languages, being an array of arguments passed to this script (or an empty array if no arguments were provided). So, let's see it in action.
First, create a file first.jspy with the following content:
log("I would like to order ...")
run_script("second.jspy", "Hamburger", "Fries", "Cola")
Then, create a file second.jspy with the following content:
if len(args) < 3:
    log("Something's wrong!")
else:
    log(args[0] + " and " + args[1] + " with " + args[2])
Finally, load both scripts into Catana and execute first.jspy. You should see the following outcome:
I would like to order ...
Hamburger and Fries with Cola
Try to remove some of the arguments from first.jspy and see what happens.
Asking for users' input
In this example, we will provide a code asking the user for his or her input, and outputting a response based on that. To collect the input, we will use standardized prompt and confirm dialogs.
name = show_prompt("What is your first name?", "John")
is_happy = show_confirm("Are you happy?")

if is_happy:
    log("Glad to hear you are happy, " + name)
else:
    log("Cheer up, " + name)
Creating a user interface
Catana enables scripts/plugins to create a modal window, accessible via Plugins menu, define its layout and reactions to user input. Overall, the idea of the UI creation is to define individual elements, and then buttons that will, when clicked, execute a given script, providing it with arguments corresponding to the current values of UI elements. In general, it is worth getting inspired by existing plugins and their approach to UI creation.
Every UI element (text field, button, ...) should be defined as an object (or dictionary) with two mandatory properties and some additionally required ones, based on the type of element.
Let's create an example consisting of two scripts. The first script will create a modal window with two input fields and a button. When the button is pressed, it will execute the second script, downloading a structure with user-provided PDB ID N times, where N is a value defined in UI.
First, create a file ui.jspy with the following content:
# Define a "text" element showing a textual label (not editable by the user)
label = {
    type: "text",
    name: "num-label",
    # Content property defines what text will be shown
    content: "Provide PDB ID and number of copies:"
}

# Define input field accepting arbitrary text
input_pdbid = {
    type: "input-text",
    # Name property is important for elements that store user's input
    # since we will use it to retrieve the value of these elements later on
    name: "pdbid"
}

# Define input field accepting numbers only
input_copies = {
    type: "input-number",
    name: "copies"
}

# Define a button that will call script "load.jspy" when clicked
button = {
    type: "button",
    name: "load-button",
    content: "Load",
    callback: "load.jspy"
}

# Create a modal window with a given title and UI elements (order matters)
add_modal_window("Example Window", [label, input_pdbid, input_copies, button])
Then, create a file load.jspy with the following content:
# Scripts called by UI button receive as their first argument a dictionary
# where keys equal to the names of UI elements providing some user-defined value (e.g., input field) and values correspond to the current values of these elements
if len(args) > 0:
    # Get dictionary of UI element values
    elemsValues = args[0]
    # Access values of UI elements based on their .name property
    pdbId = elemsValues["pdbid"]
    copies = elemsValues["copies"]
    # Execute given number of fetch_rcsb calls
    for i in range(copies):
        fetch_rcsb(pdbId)
else:
    log("No arguments provided.")
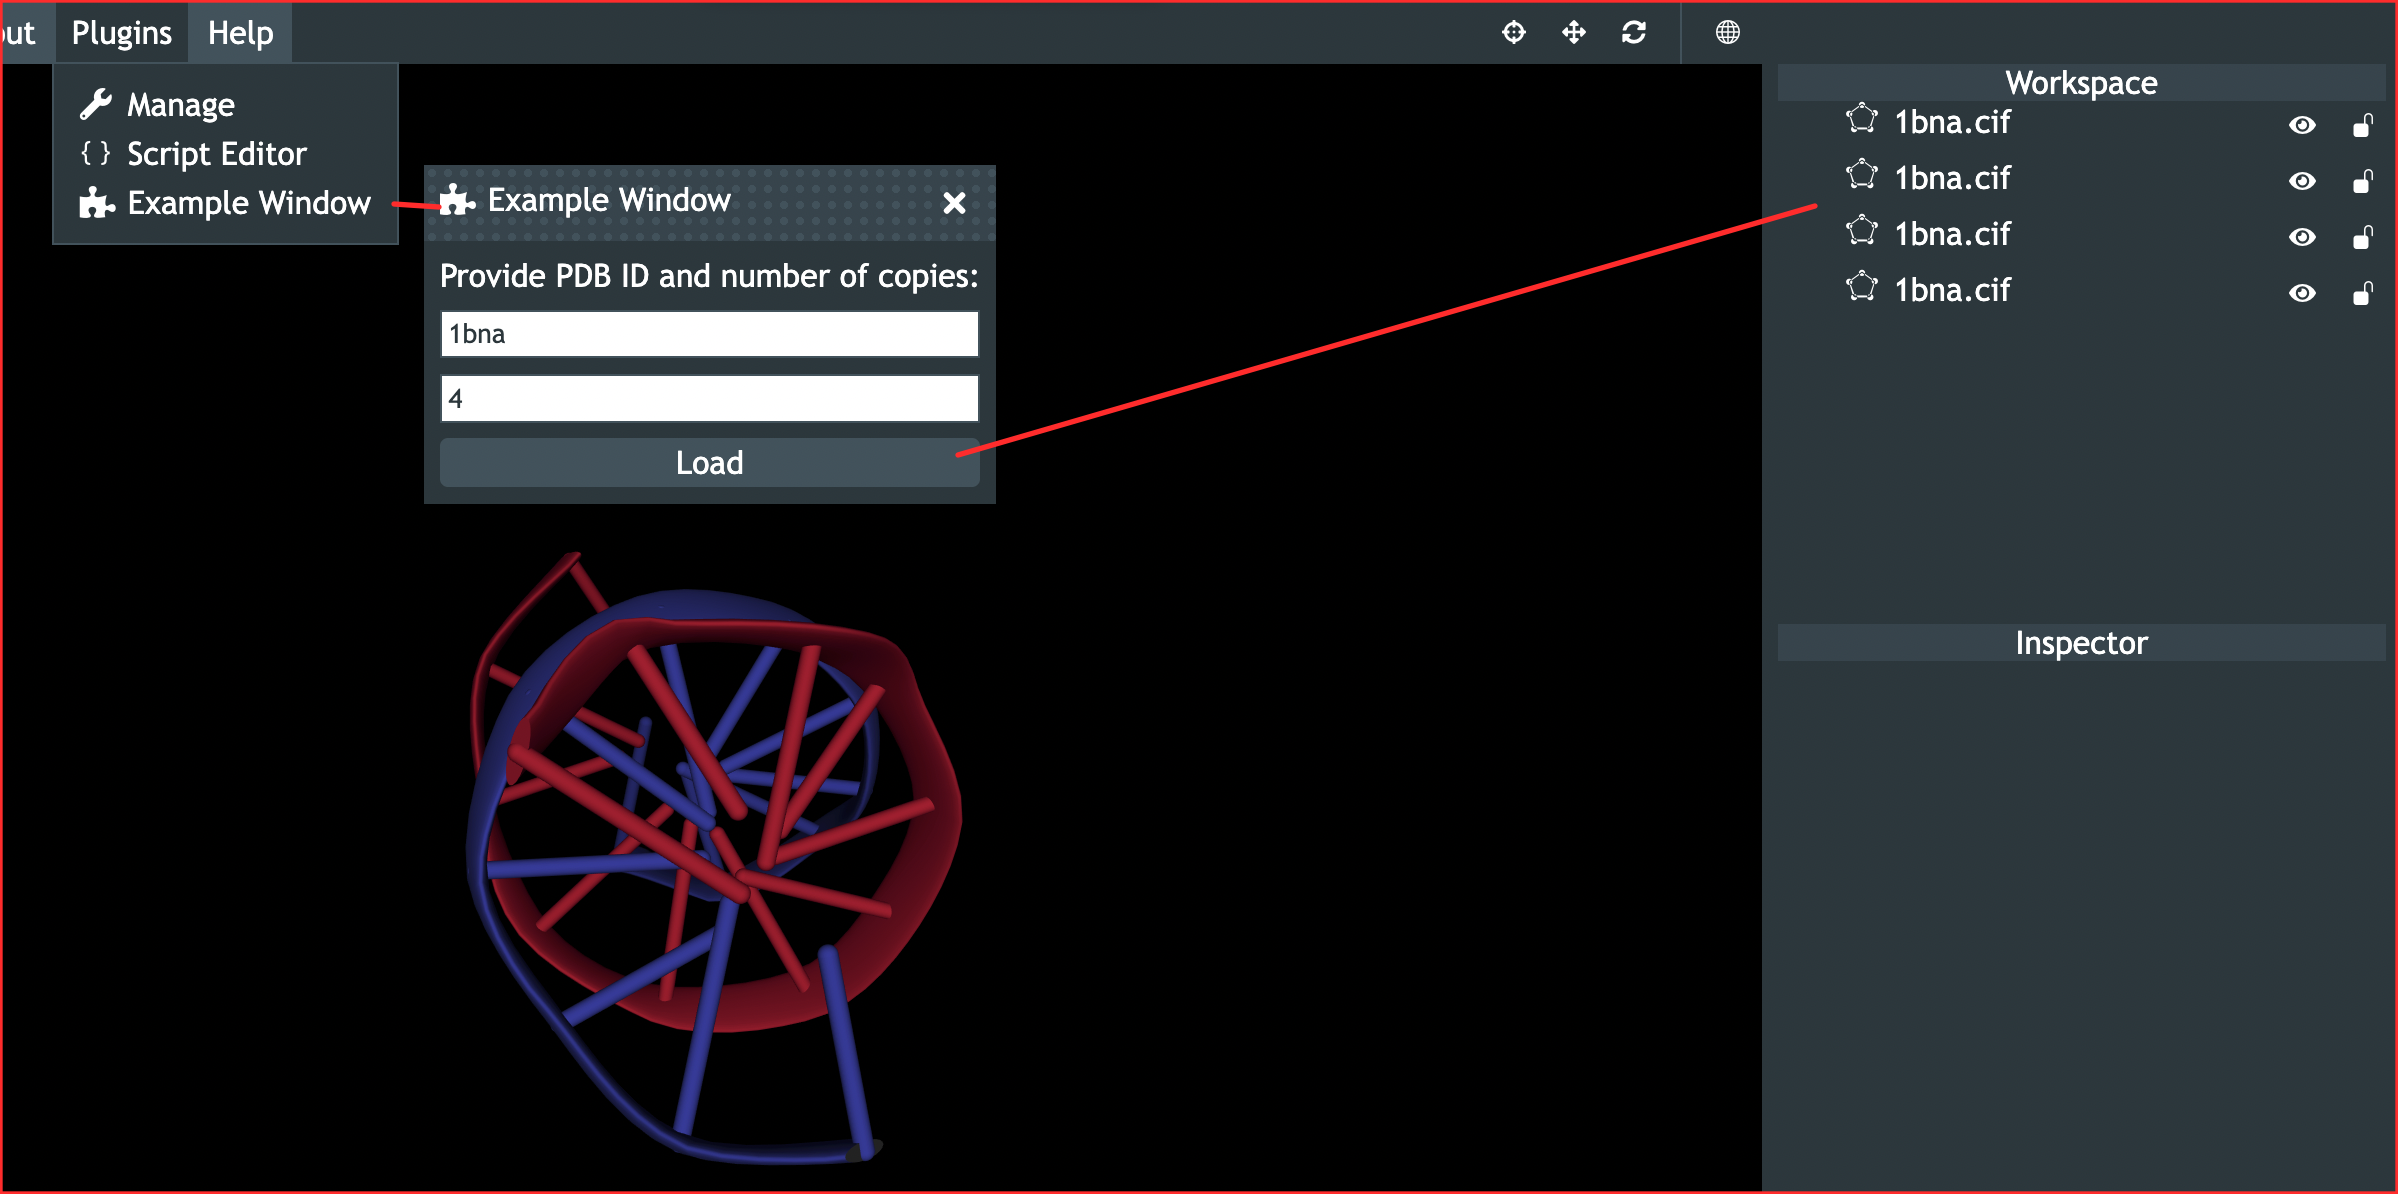
Finally, upload both files to Catana, and then execute ui.jspy. Now, go to Plugins menu and you should see a Example Window option there. This is the modal window you created with ui.jspy. Open this window, provide PDB ID to the first input element, number of copies to the second input element, and press "Load". This will internally execute load.jspy script that will download given number of PDB structures of Catana. The possible outcome is illustrated below:
Creating a plugin file
At this moment, you should understand how to write both simple and more complex scripts. It is time to transform them into a plugin. In general, there are three steps you should go through:
- Decide on the plugin name (it should contain only letters and hyphens)
- Make sure that if you run scripts from other scripts, the
run_scriptcall contains also the scope name (the same applies for UI button'scallbackproperty) - Create a plugin file (*.catplg) providing plugin's metadata
Let's now demonstrate a creation of a simple plugin, based on the UI example above.
We will call the plugin pdb-fetcher.
First, create two scripts – ui.jspy and load.jspy. These two scripts will have the same code as shown above except addition of a scope information to ui.jspy. Thus, ui.jspy will now look like this:
# Define a "text" element showing a textual label (not editable by the user)
label = {
    type: "text",
    name: "num-label",
    # Content property defines what text will be shown
    content: "Provide PDB ID and number of copies:"
}

# Define input field accepting arbitrary text
input_pdbid = {
    type: "input-text",
    # Name property is important for elements that store user's input
    # since we will use it to retrieve the value of these elements later on
    name: "pdbid"
}

# Define input field accepting numbers only
input_copies = {
    type: "input-number",
    name: "copies"
}

# Define a button that will call script "load.jspy" when clicked
button = {
    type: "button",
    name: "load-button",
    content: "Load",
    callback: "pdb-fetcher::load.jspy"
}

# Create a modal window with a given title and UI elements (order matters)
add_modal_window("Example Window", [label, input_pdbid, input_copies, button])
Now, let's create a main *.catplg plugin file. It has a JSON structure that can be generated manually or with a help of a plugin-init.py Python (3) script present on the official plugin repository. If you open this script, it documents the meaning of individual fields so we will not do it here now. Rather, we will use this script with the following arguments:
python3 plugin-init.py pdb-fetcher "This plugin downloads PDB file given number of times" "My Name"
This will output file pdb-fetcher.catplg. Move this file to the same folder as scripts above and open it. You should see the following content (some differences are possible depending on the time you read this tutorial):
{
    "name": "pdb-fetcher",
    "description": "This plugin downloads PDB file given number of times",
    "version": "1.0.0",
    "author": "My Name",
    "thisUrlTemplate": "https://raw.githubusercontent.com/barisicgroup/catana-plugins/main/{name}/{file}",
    "depsUrlTemplate": "",
    "scripts": [],
    "initScript": "",
    "dependencies": []
}
Most interesting fields now are scripts and initScript. The field dependencies can list names of (officially published, i.e., present on the repository) plugins this plugin depends on but we will not use it in this scenario. Let's modify the scripts and initScript fields in the following way:
"scripts": [
    "ui.jspy",
    "load.jspy"
    ],
"initScript": "ui.jspy",
These modifications will provide important metadata for the plugin. First, they will be used to inform Catana what scripts are part of the plugin (if the scripts are not uploaded together with the plugin file, Catana will try to retrieve them from URL based on the pattern provided in the thisUrlTemplate field – most probably, you will not have a reason to modify the default value in this field). Second, the value in the initScript defines what script will be automatically executed when the plugin is loaded.
So, let's see the plugin in action. Open Catana and upload all three plugin files via the Plugin Management window. Then, select the Plugins option in the Top Bar and you should see Example Window added. Open it, set some properties and press "Load". If everything goes well, the behavior should be the same as when the scripts were developed separately. The difference now is that this plugin requires no intervention from the user (i.e., (s)he does not have to find a specific script to run to add the UI elements), and it can be easily published to plugin repository, making it possible to install the whole plugin with just a single command. Good job!
Publishing plugins on the repository
Official plugin repository contains file CONTRIBUTING.md describing the process.